Restoring Homes after Water Damage: How to Test

Does your home have any water damage? Here are some ways to test your home and prevent anymore damage from taking place!
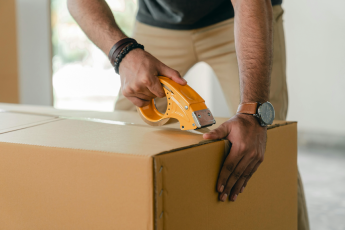
Photo By: Housing First Minnesota
How easy is it to detect water damage from the outside? We would say it’s quite easy. All you have to do is check if there’s a pipe leakage and stop it. But how easy is it to detect water damage from the insides? Now that’s the work of an expert. While you can restore your home after water damage using vacuum cleaners and dehumidifiers, unless you know what’s happening inside the walls, your house is not fully restored.
Moisture is the vicious foe of water-damaged houses. Trapped moisture inside the walls can slowly kill your home. First, the mold will grow, then the wood will start to rot, the bricks will soften, and ultimately the walls will begin to collapse.
So, how do you detect trapped moisture behind your walls? You can do it in two ways – hire a restoration company to restore your home or do it yourself.
Why Should You Hire Seaside Restoration?
Now let us tell you why option 1 is a better choice. Restoring your home using DIYs is a money-saving approach. But if you don’t get rid of the moisture in time, it can cause costly damage later on. The problem is you may not realize that water is trapped inside the walls until the signs manifest your livelihood
Seaside Restoration is equipped with advanced moisture detectors that test moisture behind the wall far more efficiently than DIY methods. An expert company will follow a meticulous process to identify water damage, define the type and class of water damage, and calculate the percentage of moisture penetration, and then chart out a remediation strategy. They wouldn’t miss a step in between, because, well, they are the experts. So, it is easier to take care of the damage in one go.
That being said, if you know how to detect moisture, you can go ahead and complete restoring your house on your own. But, if you have detected high moisture level and aren’t sure what to do next, get aid from the nearest restoration company.
How Can You Detect Moisture Using DIY Probe Detector
There are multiple reasons why moisture can get into your house and the number is an inefficient restoration process. While professionals use thermal imaging on thermographs to locate trapped moisture and leaks inside the wall, you can try the following method to do a quick test.
- Drill two holes inside the walls. You can drill it either from the outside of the house or from the inside. The holes should be 1 inch apart and about 3/16 in diameter. When it’s the interior of the house, drill straight into the insulation. If it’s the exterior of the house, pass your drill through the siding and stop just before the exterior sheathing.
- Use a good quality probe moisture meter. Pass the probe through the drilled holes. Switch on the meter and start taking the readings by following the instruction written on the user manual. Ensure the readers are steady and accurate. Take readings at different intervals, such as once every one hour. Calculate 3 readings at the least.
- Compare the level of moisture to the normal levels mentioned. While getting a zero is unlikely because the even meter holds some amount of moisture, let alone the walls. However, normal reading should fall anywhere between 7 and 13. A little over will not harm your house. But if the average level reads excessively high, you have to immediately plan for restoration.
There are different types of moisture meters available in shops. Some study the electromagnetic waves under the wall surface to determine the level of moisture. Buy the one that you think you can manage well. Fill the holes if the readings indicate a normal level. Conversely, you may have to remove the wall entirely to repair the water damage.


Leave a Comment