Tips To Install a Sump Pump

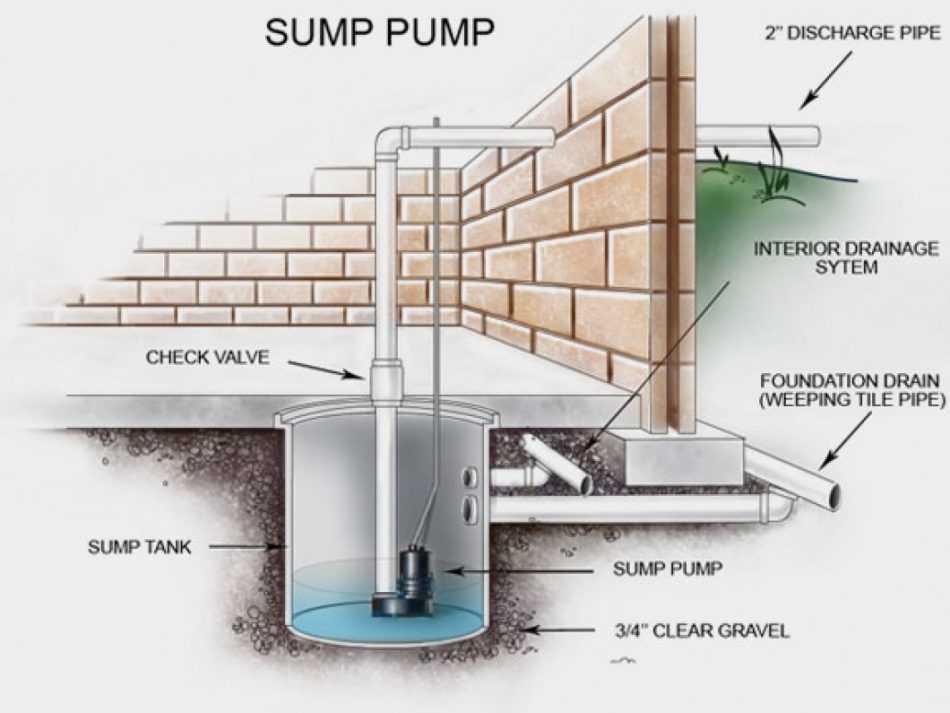
This guide shows the basic steps to installing a submersible sump pump in your basement!

It assumes you have a sump of sufficient size to hold your new pump and that electrical power and a discharge line are available. In 95 percent of cases, it is a straightforward task well within the reach of homeowners with moderate DIY skills plus confidence to approach the job.
Take your time, and soon you will have a long-lasting, professional-looking installation.
How Much Does It Cost to Install a Sump Pump
If you need additional motivation, click here to call up a couple of local plumbing outfits to see what their standard charge is for a sump pump installation. Most estimates are going to be around $200 give or take. If you can think of anything you would rather spend that amount of “cabbage” on in exchange for a few hours of labor, read on.
Gathering Your Tools and Materials
You may not need all the tools recommended here, but this is a good list to start with:
- * A 10-foot measuring tape to check the sump dimensions and measure plumbing.
- * A permanent marker for calculating and marking pipe cuts.
- * A medium flat blade and a #2 Philips screwdriver.
- * Channel lock pliers plus a small pipe wrench.
- * A work light if, like most basements, the lighting is not so great.
- * A 5-gallon bucket and old towel for cleanup and for pump testing.
- * Rubber couplings with hose clamps that fit the discharge pipe. These make assembly and disassembly easily and forgive slight errors in plumbing cuts.
- * A pair of ratcheting PVC snips or a PVC pipe saw will make professional cuts in lieu of a hacksaw or wood saw. Go ahead and treat yourself.
- * Small cans of PVC cleaner, primer and cement. Use each on every joint for tight, leak-proof bonds. Forgo the big cans unless there is a large plumbing job in the near future as they tend to dry out.
- * A dozen 10-inch nylon zip ties to bundle and support cables.
How to Install a Sump Pump in a Basement
The following steps assume a standard design submersible sump pump is being replaced with a new one that will fit the current sump basin.
- 1. Disconnect all power from the old pump by either unplugging it or turning off the breaker of the circuit to which it is connected. If the old pump is permanently wired, and the new one uses a power cord disconnect the wiring at the pump. Install a 120VAC outlet for the new pump using the old pump circuit, if it is the correct size and amperage.
- 2. Remove the lid covering the sump basin.
- 3. If your discharge pipe has a check valve, remove it. You will re-install it later.
- 4. Disconnect, or cut if you must, the vertical section of discharge pipe from the old pump and use it as a handle to extract the old pump.
- 5. Remove water and sediment from the sump before proceeding using the towel and bucket.
- 6. Attach a length of outlet pipe to the new pump’s discharge outlet that will be extend a foot above the sump after the new pump is in place. Use Schedule 40 PVC pipe and measure carefully.
- 7. Lower the new pump into the sump using the discharge pipe section as a handle.
- 8. Check carefully that the new pump’s float does not touch any part of the sump wall.
- 9. Add a rubber coupler to the pipe section extending from the pump outlet. Consider using a second rubber coupler at the basement end of the discharge pipe that exits the basement.
- 10. Take your time calculating the lengths of pipe and the fittings to use to reach from the vertical discharge pipe rubber coupling to the discharge section leaving the basement. Account for installation of the check valve. Measure twice, cut once.
- 11. Dry fit all pipes and fittings before you even touch the PVC cleaner can.
- 12. When you are satisfied with the dry fit, make alignment marks on each section of pipe and every fitting with the felt marker. Do this such that everything can be re-assembled in the same way it was during the dry fit.
- 13. Clean, prime and glue all pieces one at a time. As you glue fittings twist them with a ¼-turn for a tight bond.
- 14. Use the zip-ties to clamp the power cord from the pump along the plumbing or any other handy support.
- 15. Re-connect power to the pump and/or turn on the circuit breaker.
Testing Your Installation
Fill the sump with water from your bucket and observe the pump’s operation and check for water leaks in the discharge pipe. The pump should turn on and then off after the sump is evacuated. If the float switch is adjustable, set the on/off levels to enable the longest cycle time possible. Less frequent cycling prolongs motor life. If a significant amount of water rushes back into the sump after the pump switches off, you either forgot to install a check valve, installed it backwards or it is faulty.
Clean the Area and Admire Your Handiwork
That is all there is to it. Your pump should give you many years of dependable and quiet operation. Should any installation problems crop up, you are now equipped to remedy them.


Leave a Comment