DIY: $35 Ikea Dresser into $4,000 Dorothy Draper Chest!
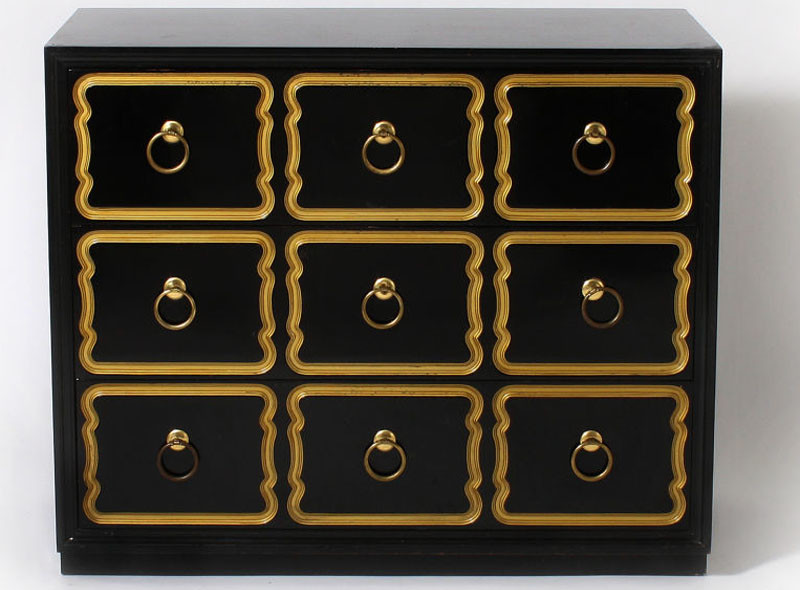
Here’s another amazing DIY project using a $35 Ikea dresser. The look was inspired by a vintage Dorothy Draper chest which is extremely rare and expensive today. Dorothy was the first person in America to establish an interior design company in the 1920’s, and was known for her modern baroque style.
I love how glamorous a cheap Ikea dresser can look with a little bit of imagination and creativity! Use it as a bedroom dresser, buffet in your living room, or a nice piece in the entrance of your home.
Keep reading for instructions on how to create your own Dorothy Draper chest!
 1st Dibs
 Marcus Design
Instructions
1) Buy and assemble a Rast dresser from Ikea, except for the drawers.
2) Prime the ‘body’ of the dresser and the fronts of the drawers. Spray paint 2 coats using RustOleum’s black lacquer

3) Blow up a picture of Dorothy’s chest online and trace the shape of the inlay on a piece of transparent paper. Cut them the same size as each drawer. Cut the stencil using an art Xacto knife, leaving gaps so that the center of the stencil stays attached to the outside. Secure the stencil onto the drawer using painter’s tape.

4) Use Liquidtex’s Iridescent Rich Gold heavy body acrylic paint, and carefully paint on the design. Remove the stencil after allowing the paint to dry for about 1 hour. Fill in the gaps left from taping the stencil and let it dry overnight.
5) The next day, go over the gold free-hand to make it even thicker.
6) Put the drawers together on the built shelf, and put in some gold ring pulls. Voila!

Keep in mind that Dorothy Draper chests come in all color combinations. Here is some more inspiration:
 Even featured on Sex and The City!


Wow…what a transfermation!!! Brilliant project.
Happy Halloween~
Hi Mi,
Thanks for stopping by! I agree the project is really brilliant and so do-able!
Suzy Q